Skip to content
Details

Custom LED Light Jewelry Boxes

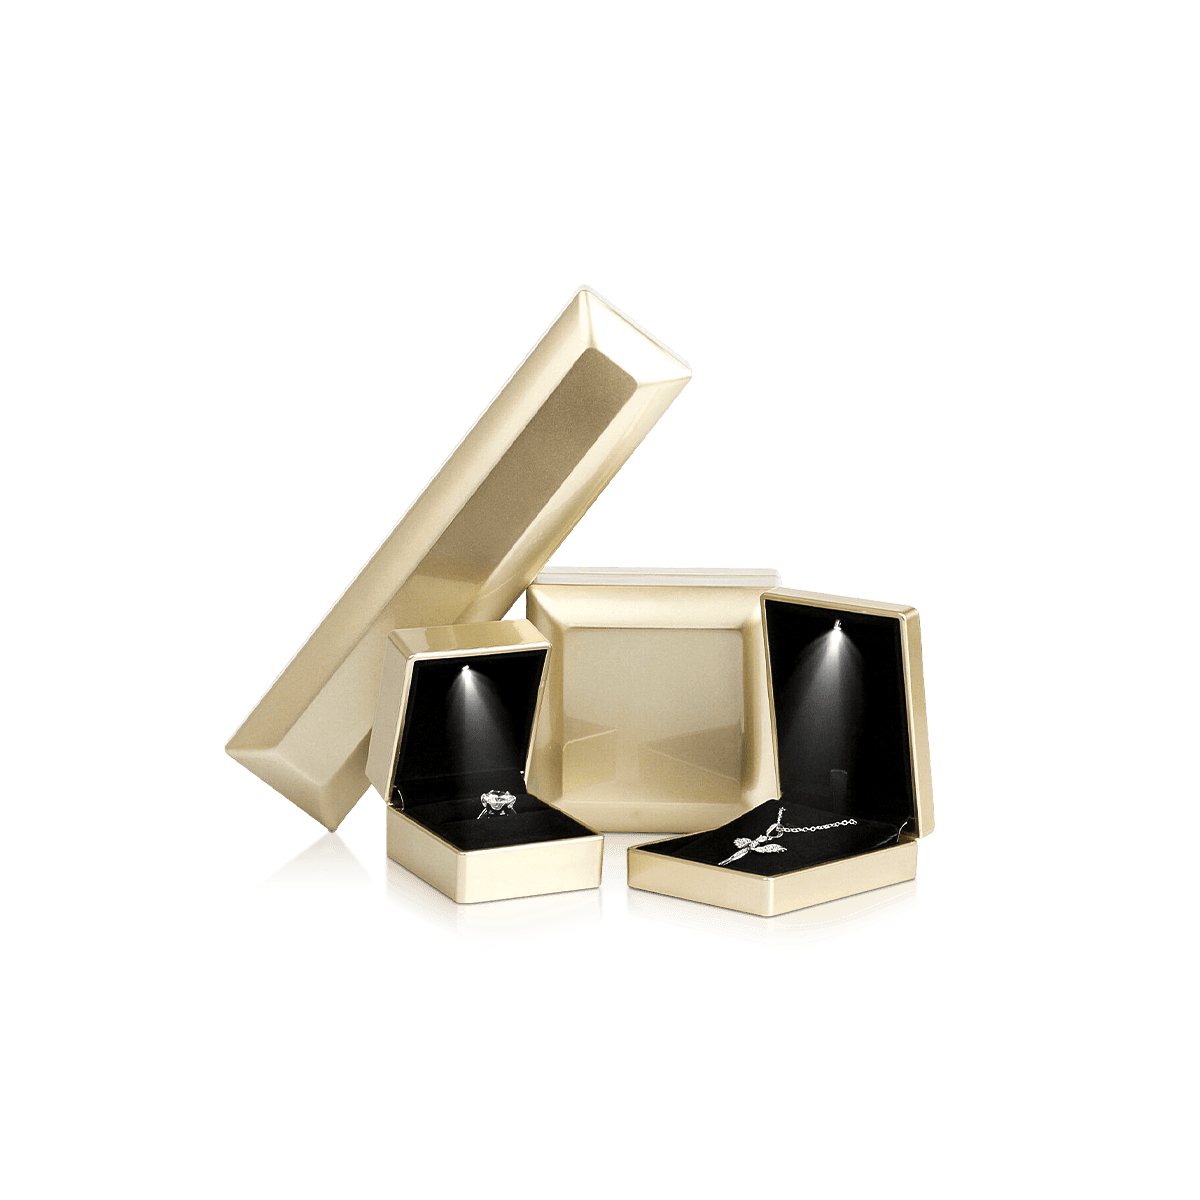
Illuminated jewelry presentation planned around beam position, opening angle, switch timing, insert alignment and the exact point where the jewelry sits when the lid opens.

The Beam Has to Land on the Piece

Adding an LED to a jewelry box is easy to describe. Making the light hit the jewelry correctly is the real packaging problem.

A light mounted inside the lid has a fixed position. The jewelry also occupies a fixed position in the insert. Between them sits the opening angle of the lid.

If those three points are not coordinated, the box can technically light up while missing the product.

A diamond ring may sit below the brightest part of the beam. A pendant can fall outside the center of the illuminated area. A tall setting can cast an unwanted shadow onto the insert. A broad light source can illuminate the entire interior while failing to draw attention to the jewelry itself.

Custom LED Light Jewelry Boxes should therefore be designed from the illuminated focal point backward.

The first question is not where the LED fits. It is where the light needs to arrive.

Set the Jewelry Position First

Define the product centerline, display height and presentation angle before fixing the light source.

For rings, that may be the center of the stone rather than the center of the box.

For pendants, the focal point may sit lower because the chain extends upward while the pendant carries most of the visual weight.

For earrings, two illuminated points may need to read as one balanced presentation.

The insert establishes those positions. The light should respond to them.

Brands working across several item types can use Jewelry & Accessories packaging to separate ring, necklace, earring, watch and set requirements before choosing one illuminated format for everything.
Opening Angle Changes the Aim

A lid-mounted light does not illuminate the same area at every opening position.

At a shallow opening angle, the beam can strike the front of the insert. As the lid moves farther back, the illuminated point shifts.

The intended presentation angle should therefore be part of the physical specification.

A box that looks impressive only when the lid is held at an unusual position creates an inconsistent customer experience.

Design Around the Natural Stop

The ideal lighting effect should occur when the lid reaches the position a customer naturally leaves it in.

That may be determined by hinge geometry, lid construction or another opening mechanism.

The light, jewelry and lid stop should be assessed together rather than independently.

This matters particularly for proposal and presentation boxes because the customer is unlikely to adjust the lid repeatedly to find the best lighting angle. The visual moment happens immediately.

Do Not Hide the Jewelry Behind the Lid

A deep lid can create room for lighting hardware, but it can also alter the viewing angle.

If the lid blocks part of the product from the customer's line of sight, adding more light does not solve the presentation problem.

The box needs both illumination and visibility.

Light Timing Changes the First Impression

An integrated lighting system can be arranged so illumination begins as the box opens. The exact activation point affects the reveal.

If the light comes on too early, it may glow through the opening before the jewelry can be seen.

If activation occurs too late, the customer may already be looking at the piece before the intended lighting effect appears.

The strongest result usually coordinates activation with the moment the jewelry enters view.

That timing is a mechanical issue as much as an electrical one.

Treat the Switch as Part of the Hinge Zone

Whether activation uses a switch, sensor or another mechanism, the trigger needs a repeatable relationship with the lid.

Small changes in lid travel should not create unpredictable operation.

The activation mechanism also needs space that does not interfere with the wrapped edges, hinge movement or inner lining.

It should feel integrated into the box rather than added after the structure was completed.

The Light Source Needs Its Own Space

A standard jewelry box can devote most of the lid to structure, lining and decoration.

An illuminated box has additional components to accommodate.

The light source, power components, switch mechanism and necessary connections all occupy physical space somewhere in the structure.

That affects lid depth, wall thickness and interior finishing.

The solution is not to conceal components wherever an empty cavity happens to exist. Their positions need to be accounted for from the beginning.

Keep Hardware Out of the Reveal

The customer should see jewelry, not an unfinished technical cavity.

Visible openings, uneven lining or a bulky housing around the light can weaken the presentation the lighting system is meant to improve.

The interior surface should transition cleanly around the light source.

Any access required for the power system also needs to be resolved without compromising the presentation face.

Do Not Let the Lid Become Top-Heavy

Adding components to the lid can change how it feels when opened.

A compact ring box has little mass to begin with, so additional hardware can become noticeable.

The hinge and base need enough stability for the box to remain composed at the intended display angle.

This is one reason LED integration should be treated as structural planning rather than a finishing option.

The Insert Is Part of the Lighting System

In a conventional jewelry box, an insert controls product position.

In an illuminated jewelry box, it also controls where the product sits relative to the beam.

That makes insert tolerance more important.

If the insert shifts several millimeters or the jewelry settles lower than intended, the visual target moves while the light source stays fixed.

Control Display Height

The height of a ring pad, pendant platform or earring insert determines how the product intersects the light.

A raised stone can catch the beam differently from a setting buried deep in foam.

For a necklace, the pendant may need a slight lift while excess chain remains hidden behind the support.

The insert should create the intended viewing geometry before the lighting position is approved.

Exact product dimensions and presentation geometry can be built into Custom Product Packaging when the jewelry, insert and box need to function as one system.

Prevent Rotation

A ring that rotates inside its slot may turn the stone away from the intended illumination.

A pendant that slides sideways may leave the focal area completely.

The insert does not need extreme pressure. It needs repeatable positioning.

That is different from simply making the cavity tighter.

One Light Position Does Not Suit Every Jewelry Type

LED jewelry packaging becomes weaker when one illuminated box is expected to present every product equally well.

Different pieces occupy different visual zones.

Rings

A ring usually creates a compact focal point.

The light can be aimed toward the stone or upper setting while the insert holds the shank at a deliberate angle.

The more precise retention work still belongs to Ring Boxes; the illuminated version adds the lighting relationship on top of that geometry.

Pendants and Necklaces

A pendant has a central visual point, but the chain creates a much larger packing footprint.

The light should emphasize the pendant without making exposed chain routing the main visual feature.

A broad necklace box may also need a different beam spread from a compact ring box.

Earrings

A pair needs balanced illumination.

A narrow hotspot on one earring can make the pair appear visually uneven even when both pieces are positioned correctly.

Watches and Larger Pieces

Larger items occupy more surface area and may require a less concentrated lighting approach.

The packaging should respond to the visible product footprint rather than simply scaling up a ring-box lighting arrangement.

Interior Color Changes the Result

The same LED can appear different against different interior materials and colors.

Dark lining absorbs more of the surrounding light visually, which can make the illuminated jewelry stand out strongly. Pale interiors can spread more visible brightness across the box.

Highly reflective surfaces may introduce glare.

The interior therefore contributes to the lighting effect even though it does not generate the light.

Judge Jewelry and Interior Together

Do not approve interior color from an empty box alone.

White metal on a very pale insert, yellow gold against warm fabric or a colored gemstone against a saturated background can each create a different visual relationship once illuminated.

The purpose is not to create maximum brightness.

It is to make the jewelry easy to see while preserving the intended brand mood.

For boxes where soft fabric itself is the defining feature, Velvet Lined Boxes carry that interior decision without making illumination the central mechanism.

Brightness Is Not the Same as Better Presentation

Too little light can make the LED effect insignificant.

Too much can create a harsh hotspot, visible glare or an interior that looks more like a display fixture than fine jewelry packaging.

The target is controlled emphasis.

Watch Reflective Stones and Metal

Polished metal, faceted stones and glossy surfaces can send concentrated reflections toward the viewer.

A light source that appears comfortable against an empty insert may look much stronger once a reflective piece is placed in position.

That is why the actual jewelry, or a physically representative sample, should be used when evaluating the lighting effect.

Color Temperature Changes the Mood

Warm and cooler light tones can change the visual character of the presentation.

The decision should be made against the jewelry, interior color and brand positioning rather than treating one LED tone as universally premium.

Light tone and activation method should be specified rather than assumed.

Physical Testing Belongs at Full Open

This is one jewelry format where a physical sample carries unusual importance.

A digital rendering can show where the light is intended to sit. It cannot fully demonstrate beam spread, reflections, activation timing, hinge behavior and the effect of the real jewelry under illumination.

The sample should be evaluated as a sequence:

  1. closed box
  2. first movement of the lid
  3. activation
  4. jewelry entering view
  5. lid reaching its normal stop
  6. box remaining open
  7. repeated closing and reopening

A 3D mockup can confirm visual proportion and branding direction. Beam spread, reflections, activation timing and hinge behavior require a fully built physical sample.

Test More Than One Piece

If one box is intended for several jewelry designs, place each representative item into the insert.

A lighting position approved around one stone height may perform differently with a lower setting or different pendant size.

This is a functional lighting check, not merely a color proof.

Branding Should Not Compete With the Light

The illuminated reveal is already a strong visual event.

Exterior branding does not need to compete with it through excessive finishing.

A restrained logo, foil mark, embossing or carefully printed wrap can establish the brand before opening. Once the lid lifts, the attention should move inside.

For a conventional premium presentation without integrated illumination, Luxury Jewelry Boxes can place greater emphasis on material transitions, tactile finish and structural reveal.

An LED box has another mechanism doing part of that work.

Brand graphics can still remain consistent across custom printed boxes while illuminated and non-illuminated jewelry packs use different internal constructions.

Retail Demonstration Changes Battery Use

An LED box opened once during gifting has a different operating pattern from one repeatedly demonstrated at a jewelry counter.

Retail staff may open the same presentation box many times before the piece sells.

That changes what should be evaluated during sampling.

Repeated activation should remain consistent through the expected handling pattern. The lid should still sit correctly, the switch should trigger predictably and the box should not become awkward to operate after repeated demonstrations.

Do not assume that a box used primarily at a retail counter has the same functional requirement as one intended for a single proposal or gift reveal.

The sales environment changes the duty cycle of the lighting feature.

Transit Must Protect the Light as Well as the Jewelry

An illuminated jewelry box has more internal complexity than a conventional presentation box.

Transit protection therefore has to preserve the insert, lid alignment and integrated lighting components as well as the jewelry itself.

The presentation box should not serve as the parcel shipper.

It needs an outer shipping pack that prevents crushing, concentrated impact and uncontrolled movement.

Heavy pressure on the lid can affect more than exterior appearance if lighting components occupy that area.

The jewelry also needs to remain seated in the insert during transit so it arrives at the intended focal position.

A perfect beam is irrelevant if the ring reaches the customer rotated sideways.

Quote the Lighting System, Not Just the Box

An LED jewelry box brief needs more than length, width and height.

Useful production inputs include:

  • jewelry type
  • exact product dimensions
  • intended display angle
  • insert style and display height
  • desired illuminated focal point
  • approximate light position
  • preferred light tone
  • activation method
  • lid opening position
  • exterior construction
  • interior material and color
  • logo treatment
  • quantity by size
  • retail, proposal, gifting or ecommerce use
  • outer shipping requirements

Custom Packly's USA MOQ starts from 100 boxes. US production, extensive customization, free shipping, free 3D mockups and design support can be applied according to the project.

Standard turnaround is 4–6 days after final artwork and specifications are approved. Complex structures, specialty materials or advanced finishes may require additional time.

Once the jewelry position, box construction and lighting specification are defined, an instant custom packaging quote can be based on the complete presentation system rather than a standard jewelry box with an LED added afterward.

Approve the Moment the Lid Stops

The final approval point is not the closed box.

It is the moment the lid reaches its intended open position.

At that instant, the light should already be active. The jewelry should remain in the planned position. The beam should land where intended. The insert should stay visually clean and the lighting hardware should recede from attention.

That single view exposes most of the important decisions at once.

If the stone sits outside the brightest area, move the product position or lighting geometry. If the hardware dominates the interior, resolve the housing. If glare overwhelms the piece, adjust the lighting choice rather than adding another finish to distract from it.

The defining advantage of Custom LED Light Jewelry Boxes is not simply that they contain a light.

It is that the box, insert and illumination are coordinated so the jewelry appears exactly where the light expects it to be.

FAQs

Rings, pendants, earrings with stones and small keepsake pieces benefit the most because the light draws attention to a single focal item without visual clutter.

No. The insert still matters because it keeps the jewelry centered under the beam and prevents twisting during handling.

Yes. They are especially useful when the opening moment matters, such as engagement presentations, bridal consultations and private showroom reveals.

It works best as the inner presentation box placed inside a protective mailer or shipper so the outer pack handles transit pressure and the LED box preserves the reveal.

LED Light Jewelry Boxes create a more dramatic reveal and stronger first-open emphasis, while Velvet Lined Boxes focus more on soft-touch presentation without the added illumination effect.

Process

How it works

Your Packaging Journey, From Idea to Production and Delivery

01

Tell Us Your Specs

Custom packaging boxes

Tell Us Your Specs

Provide size, quantity, printing, and finishes.

02

Get a Fast Quote

Custom packaging boxes

Get a Fast Quote

Instant transparent pricing, no hidden fees.

03

Design and Approval

Custom packaging boxes

Design and Approval

Artwork checks, revisions, and final sign-off.

04

Produce

Custom packaging boxes

Produce

Expert manufacturing to meet deadlines.

05

Ship to Your Door

Custom packaging boxes

Ship to Your Door

Hassle-free, flexible delivery options.

Get Your Quote for Custom LED Light Jewelry Boxes

Share your product details, size, quantity and artwork needs. We’ll help choose the right packaging style and send a clear quote.